
Replacing Window Handles
Replacing your window handles is a great option to improve the look of your home as well as increase the security of your home. It's important that you use the correct handle and lock for a successful installation.
To begin, you must determine if your old window is square by measuring the width in three places and taking note of the most compact measurement.
How do you replace the window handle
Switching your window handle is a fairly simple project that can be completed in just a few steps. With the proper tools, you will be able to put the new handle installed quickly and safely. The trick is to pinpoint the issue and make sure that the replacement handle is the proper size for the window you have. After the handle is installed, it is vital to test it and make sure it works as you it was designed to.
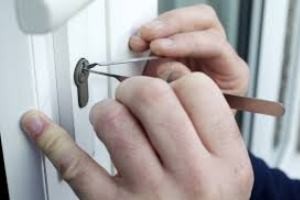
To replace a window handle, first you need to take out the previous one. This can be accomplished by ensuring that the window is in the unlocked position, and then removing the screws on either side of the handle. After the screws are removed you can remove the handle and access the two screw holes that secure it.
You'll need to measure the length of the spindle on the handle, and then purchase a replacement with the same length. This measurement relates to how far the spindle extends out from the base of the handle and the amount of spindle that goes into the window frame. If you're not sure how to measure the spindle length seek out a professional because they can provide you with an accurate measurement.
Installing the new handle is straightforward after you've measured and replaced the spindle. You will need to ensure that the window is unlocked and align the handle with the screws in place. After the handle is installed then you'll have to tighten and insert the screws.
It is crucial to adhere to the instructions even though it's an easy procedure. If you don't, you could end up with the handle that isn't secure or isn't functioning as it should. Before replacing the handle, also check to see whether there are any other issues with your window or the mechanism that operates it. The most common cause of broken window handles is the wearing down of the operating mechanism over time. In this scenario, it is not necessary to replace the handle, but rather the operator.
Identifying the problem
There are a variety of things that could stop the window handle from functioning. Firstly, it may be that the handle has fallen out of the window and can be repaired with a simple set of steps. It could also be that the gears inside the handle have worn out and require to be replaced. This is usually done by removing the handle and examining it for indications of wear.
This is a more serious issue, since the locking mechanism, not the handle, will be the cause. This is a more serious issue because it blocks the window from opening from the inside. It can also make it difficult for someone to gain entry through the window.
Another reason that can cause windows that don't open is that the splines of your crank operator shaft have been stripped. You can check this by turning the handle to determine if there are signs of wear on the teeth of the crank operator shaft. If they do, you will need to replace the crank operator. You can buy these online or at your local hardware store or home center.
Another reason that can cause a window not opening is that the handle was not properly "nestled" and is not sitting correctly in the cover for the operator. This is often caused by dust, dirt and rust that have built up over time. It could be due to the handles not being lubricated. It is usually a simple fix that requires an extended set screw (available at home centers and hardware shops).
It is also important to know that the handles you use on uPVC window types may differ. This is due to the fact that handles are made in different ways by various manufacturers, and this can cause them to be slightly different in size. You will need to make sure that the replacement handle is the right size for your window, and you can do this by measuring the distance between screw holes on the handle base.
Identifying the new handle
Before you can put your new handle in place, it is important to ensure that you select the right type of handle for your window. Not only will this help make sure that your windows are safe, but it will also ensure that the handle is properly fitted and operates smoothly. When you are choosing the right handle, it is important to take into consideration the design size, the lock mechanism and the size. It is important to consider the durability of the handle. Handles are susceptible to damage over time.
The cockspur handle is a common handle on older uPVC windows. They have a spindle that goes through the handle's base, and into the gearbox inside the lock in the frame of the window. When repairmywindowsanddoors.co.uk turn the handle, it turns the mechanism inside and opens the window. Cockspur handles can be locked using keys and are extremely simple to use.
The espagnolette handle is another kind of handle that is employed on modern uPVC Windows. These handles are found on tilt and turn windows and when you open the window, you can move it either by stretching the operating arm or using an incline crank to turn the mechanism that opens the window. Espagnolet handles often come with a multipoint locking mechanism which gives additional security.
If you are replacing an espagnolette handle then you should ensure that the new handle has the correct step height. This is the distance from the base of the nose up to the screw. Through the years, various steps were used. However 21mm is the standard for uPVC and 9mm for aluminum.
After you've chosen the best type of handle for your window, it's time to get started. Remove the old handle by unscrewing the window with a screwdriver. You'll be working in a well lit area because some screws are difficult to spot. If you're having trouble getting rid of the screws, rotate the handle 90degrees and look for small stickers or caps covering the screws. Once you've removed your old handle, make a note of the measurement of the spindle's base to allow you to purchase a replacement with the same length of spindle.
Getting started
When it comes to replacing windows handles there are a number of different options to choose from. The first thing to decide on the type of handle you require. This will let you choose the right replacement and ensure that the new handle fits properly.
Once you've decided on the type of window handle you need, it's time to start shopping. There are many different types and finishes available, so it's important to take the time to find the right one for your home. Choosing the right handle will ensure that your windows are as safe as they can be and also add a touch of class to your home.
Installing the handle is simple once you've located it. The process is the same that you used to remove the old handle. Make sure to adhere to the directions to avoid any issues. Installing the new handle requires the spindle be aligned to the screw holes that are already in place. Once the handle is in place you can screw it in place and then put the screws back in (be sure to use screw caps if they are included with the new handle).
If you have an older uPVC window you may need to cut the spindle to size prior to putting it in. This can be accomplished using a handsaw or an angle grinder. Wear safety glasses and gloves.
After you have installed the new handle, you'll be able to test it to confirm that it functions exactly as it should. If you are confident that the handle functions properly, replace the screw caps and take pleasure in your new uPVC uPVC window handles.
A majority of homeowners can replace the window handle. With a bit of planning and careful execution, you will get your window handles looking and working like new in no time at all! If you discover that your uPVC handles are damaged replace them as soon as you can in order to ensure your windows are safe and to avoid further damage.